General Instructions for
Making Medical Play Doll Hospital Gown
Supplies: o scraps
of small-print fabric, kid-friendly patterns, large enough for pattern
o ¼” ribbon for ties (8-7”-length pieces
for each gown)
Here
is the link for the gown pattern. It is
a .pdf file easily printed on an 8.5”x11” piece of paper.
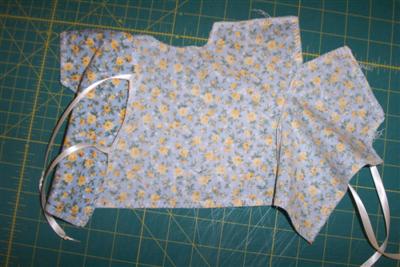
PLEASE NOTE: A recent change was made to the construction of this little gown. One shoulder should be left open with ribbons attached for tying. Detailed documentation has not been included in these instructions as yet, but here are a few photos to give you an idea of the concept. The photo indicates two pair of ribbons sewn on the shoulder, but recent changes require only one pair of ribbons sewn in the middle of the open shoulder seam.


Place
the pattern lengthwise (straight of the grain goes down the middle length of
the pattern) on doubled fabric. Cut two
on the fold if possible (slicing the fold on one piece to make the two front
pieces). If the scraps are too small
for a fold, just cut four pieces, and sew a ¼” seam at the center back.

Either
zigzag or serge the raw edge of each of the two front centers, the raw edge
of each sleeve opening (4 of them), and the raw edges of one shoulder seam. This one shoulder seam will be left open and ribbons attached for tying.
Trim threads even with raw edges, except for the open shoulder threads. If serged, you can run the thread ends under the stitches to finish.


Zigzag
or serge the one shoulder seam, right sides together.

Use a double-eyed needle to run serged thread ends back through the seam just sewn.

Press the one shoulder seam to one side.

Zigzag or serge the raw edges of the neck. With a double-eyed needle, run the serged thread ends behind the stitches along the center front.


Zigzag
or serge side seams. Trim threads even
with raw edges of the bottom edge.
However, run the serged thread ends back through the seam at the opening
of the sleeves, as you did with the shoulder seam. Press side seams to one side.

Zigzag or serge the raw edge of the bottom.

Run serged thread ends behind stitches of center front.

Press gown nice and flat. That makes the gown resemble a freshly laundered hospital gown.

Prepare ribbons for sewing onto the gown for the ties. Cut eight lengths, 7” long. Cut one blunt and the other end slanted.

Tie a half knot close to the end of the slanted end of each piece.


Fold under a small seam to finish the edge of the ribbon before sewing it onto the gown. Sew one ribbon on the edge of the center front at the neck. Finger press a mark at the center of the center front piece, as in the next photo, and sew one ribbon on the edge at the press mark.


Set your machine to a small zigzag stitch. Here are the settings I use on my sewing machine.

Sew the ribbon onto the gown.

Follow the same steps for the other side, WITH ONE EXCEPTION. Sew the ribbons 1” from the edge, so the gown edges will overlap when the ribbons are tied.

PLEASE NOTE: I have not included photographs of the recent change in the gown (keeping one shoulder seam open), but sew ribbons on either side of the open shoulder seam for tying, sewing a pair in the middle of the open shoulder seam. Ignore the fact that the photo below has a pair of ribbons sewn at the neck. I need to update this page!
Voila! You have
completed a really cute little hospital gown for the medical play cloth doll. 